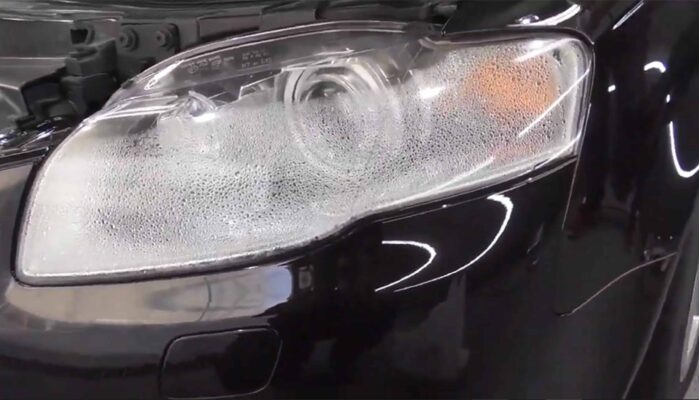
Got moisture in the headlights or fog lights? Let’s learn some tricks to remove condensation from the headlights in an easy way. Foggy headlights may block a portion of the light coming from headlights which in turn affect nighttime visibility.
You will also learn to find out the leak and how to seal it so that moisture doesn’t get back into the headlights. Moisture can blow out and damage your headlights.
Before you spend thousands of your hard earned money on replacing the headlights, try this guaranteed easy fix by us.
Foggy headlights
Foggy headlight is a situation when water vapor gets inside the headlight glass. This can cause poor road visibility and affect the aesthetic looks of the headlights.
This is caused by condensation of water. Generally, there is a leak in foggy headlights. Through this leak, some amount of water gets in. Then when the water gets heated from the heat coming out from the headlamps, then they condense and form vapors inside the headlight compartment.
Sometimes, when it is ignored, it may turn the headlights yellowish which is plain ugly.
What makes the headlights foggy?
A cracked and damaged seal
This issue is common as your vehicle gets old. Slowly the seal between the headlights reflector and the front glass begins to wear off. This can lead to ingression of water, which may condense later upon getting heat from the headlight bulb.
It is difficult to find out if the seal is intact. One easy way is to check the water level inside the headlight assembly before a car wash and then after the washing, watch again. If it increases then this issue is confirmed.
Blocked air vents
Headlights have small air vents to let the heat from the headlight bulb out from the assembly. When these vents get blocked, the fixture will get heated and condensation will be formed. This is relatively easy to check for. Just look at the small vents in the backside of the headlight housing and clean it if required.
How to remove water vapor from a car headlight:
At the beginning we need to completely open the headlights. For this, find the clips which hold the headlights in place. You may also need the help of pliers here.
Disconnect the bulb connection from the setup and carefully remove the bulb without breaking it.
To remove the condensation you can just keep the headlight compartment under direct sunlight. Or if you want to make the process faster, you can use a hair dryer to make the water evaporate faster. You can also use a heat gun.
If you have huge condensation deposits then you can also use silica gel packs to absorb the water vapors.
After drying, fit the lamp back into the headlight compartment and clip on the headlight.
Now for improving the looks further, use RV wax and gently rub it on the headlight with a microfiber cloth. This will give an additional shine to the headlights. You’re good to go now.
Let us see which method to use in which situations-
After the disassembly of the headlight assembly we can remove the water vapors as per the amount of condensation.
For minor to moderate amount of condensation:
Silica gel
Silica gel is an effective absorber. If your headlight has only minor to moderate water vapors then placing a few packets of silica gel will definitely do that job easily. Silica gel can absorb water for a longer amount of time and so, this technique can be applied many times with the same packets of gel.
Hair dryer
This is a faster method to follow if you want the moisture to go away on the go. This process removes the moisture by evaporation. Find out the air vents of the headlights and place the hair dryer there and let it run for some time.
Moderate to Heavy Moisture
Pressurized Air
Blowing pressurized air through the air vents is beneficial in many ways. At the beginning, it’ll clear any clogs in the air vents. Additionally, it will do the job of removing the moisture. Furthermore, it will clear out any dirt or spider webs present inside the headlight assembly.
Heavy moisture
For this, clean the headlights with microfiber clothes after removing the seal and dissembling the set. After cleaning, seal the reflector and front glass properly so that moisture doesn’t get in, in the future.
How to prevent getting moisture inside further:
As moisture gets inside the headlights, we need to seal the leaks properly to permanently fix this issue. Follow these steps:
After you’ve opened the headlight compartment and there is no other electronic component, start filling water from the bulb hole.
You may notice drips if the compartment has major leaks. If not, blow air into the compartment from the bulb hole. Now you’ll notice the leaks. Mark the areas with a marker.
To seal leaks, use Vinyl Adhesive Caulk. These adhesives are water and heat resistant and so, can maintain the leaks in all weather conditions. After applying the adhesive, let it dry and then fit everything back to its original place.
Lastly, everything is not fixable. So, if these tricks don’t work and your headlight is damaged significantly or the headlights still collect moisture then replace the headlight assembly. Consider this as a last option as the whole assembly will not come cheap.
So, as you see, removing the moisture from car headlights is a time consuming buteasy DIY which you can easily do at your home without any heavy expense.


