Driving safely is a top priority for all motorists, and this can be achieved by obeying traffic rules and having a vehicle that functions well. Driving at night or through inclement weather is a little bit tricky given the reduced visibility and crowded roads. However, a simple tail light can enhance safety by warning other drivers of your position and letting them know when you are about to slow down or take a turn. Most tail lights are designed to last a long time, but you should know how to replace tail lights when one or both of them wears out.
Some may shy away from such a job, leaving it to a mechanic to sort out the replacement. But replacing tail lights is an easy job if you follow the right steps. Join us in this blog as we explore this easy DIY auto-maintenance task.
Checkout Here How to Stay Ahead Of Brake Problems Before They Fail
How Do You Know When It’s Time to Change Your Tail Lights?
Usually, you won’t notice a blown tail light unless someone brings it to your notice. But it is a good idea to check if the parking lights, brake lights, indicators and reverse lights are in working order before you set off on your drive.

Driving with a malfunctioning tail light can attract a fine from authorities because it can lead to accidents. Do a quick check every 2 weeks to ensure your tail lights work properly. You can ask a friend to stand behind the car while you test the parking lights, brakes and indicators. If you notice something amiss, then prepare to replace your tail lights.
Failing tail lights are common and you will see many vehicles out on the road with this problem. The common reasons for tail lights going bad are a burnt-out bulb or faulty electrical connections. The lens could also crack from impact and damage the assembly causing the tail lights to malfunction.
Changing your vehicle’s tail lights yourself can save you a lot of money and time. Just imagine dropping your car off at the service station, the mechanic takes an hour to do the job and you have to spend big bucks on a simple task. You could do it yourself at your own pace and schedule without the inconvenience.
Also, it’s a good way to gain some extra knowledge on car maintenance and you get a better understanding of your car. Besides, you can even boast about how resourceful you are and the accomplishment instils a sense of pride in you. The biggest advantage is you know you are driving safely and obeying traffic rules.
Click Here to Checkout Signs of Potential Brake Problems
Easy Steps to Change Your Tail Lights
The exact placement, specifications and installation process of tail lights in relation to a vehicle will vary depending on the make and model. It is a good idea to consult the owner’s manual for important information such as light bulb wattage, method of disassembly, etc. The following steps should help you get the job done quite easily.
Safety
Park the car in a safe, well-lit place where you will have access to the rear section. Pull up the handbrake and ensure that the car is switched off. Disconnect the battery before you start any work on the bulbs or electrical wires. Use safety gloves and goggles to protect yourself from injuries. It’s helpful to have a torch handy in case you need to get to any nooks and crannies. Keep the toolbox handy.
Open the Trunk
Open the trunk and move away any carpets or mats that could get in the way so that you have access to the tail light. Look inside the trunk toward the rear covering of the tail light. Remove any rubber beadings that are holding the tail light in place.
Locate the Tail Light
Look around for screws which are holding the lens in place and use the appropriate screwdriver to unfasten them. Take care not to scratch the lens while you are removing it. Some tail lights have plastic trim or covers that need to be uninstalled.
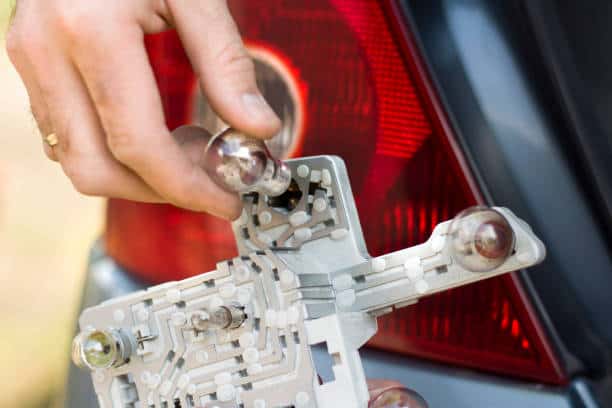
You should have access to the bulbs now. Gently twist clockwise and remove the bulbs. Observe the bulb glass for signs of burnt filaments, cracks or damage. Replace the bulb with a new one of the same type.
Check the Lens and Assembly
If the lens is cracked or damaged, you may need to replace the whole assembly. Use the appropriate screwdriver to remove the fasteners. Gently take out the plastic assembly, disconnecting the electrical connections at the back. Keep the tail light in a box in case you need to reuse any connectors or parts that are in good condition.
Install the New Tail Light
Assemble the tail light in reverse order of the method you used to remove it. Take care not to scratch the lens (try keeping the plastic cover on).
Connect the electrical wires in the right sockets and then tighten the screws/bolts to secure the assembly in place.
Reinstall the Rubber Seals & Fabric
When you are sure that the tail light has been installed correctly, reinstall the rubber seams and put the fabric, carpets and mats back in place. There are small clips that need to be wedged into place to hold the fabric in position. This keeps the electrical connections safe from moisture and damage.
Close the Trunk Lid
Try shutting the tailgate without too much force and observe the tail light assembly. It should not wiggle or the bulbs should not fall out of place when you close the trunk. Ensure that the rubber seals are intact and will provide a water-tight enclosure for the tail light.
Test the Tail Light
Have a friend start the engine and turn on the parking lights. Then ask them to apply the brakes and switch on the indicators. Finally, put the transmission in reverse with the emergency brake engaged. Keenly observe if all the lights are working fine.
If the bulbs are not working, check for blown fuses. Otherwise, there might be an electrical issue which should be sorted out by a mechanic.
Congratulations! You have successfully changed the tail light yourself and are on your way to a safer, more convenient driving experience. And it hardly cost you anything.
Read here about LED Light Bars And Their Installation Guide
The Importance of Maintaining Your Tail Lights
Regularly checking your taillights and keeping them in working order is important for several reasons.
Functioning tail lights are a legal requirement and can attract fines for road safety violations if they don’t work. Without a working tail light, motorists driving behind you may not notice when you slow down, which may lead to a rear-end collision. Turn indicators are often integrated into tail lights and need to work in order to warn drivers before you change lanes or take a turn. Reverse lights provide added illumination to increase visibility while backing up, so it is imperative that all these lights function properly.
In addition to road safety, maintaining your tail lights ensure they last longer. Dirt, dust, grime and grease can accumulate on the tail light, reducing their efficiency and increasing the chances of malfunction. Exposure to rain and moisture can damage electrical connections and cause short circuits. Keeping your tail lights clean improves brightness and prevents damage in the long run.
Some drivers often say that the rear three-quarters of a car is the best angle. What they mean is that the rear of the vehicle has its own charm which is accentuated by well-designed tail lights. Checking and maintaining lights at the rear improves the car’s overall appearance. You can also increase the resale value of a car as enthusiasts tend to judge all corners of a vehicle equally when evaluating a purchase. Replacing old or damaged tail lights can give your car a fresh new look on the road.
Click here to know How to replace brakes on your car?
Conclusion
With the right tools and knowledge, you can easily replace your tail lights in the comfort of your home garage. Not only will you save a lot of money in the process with this easy DIY job, but you also have the satisfaction of maintaining your car in good condition.
Tail lights increase safety on the road and provide drivers with peace of mind. Plus, the car looks like it just rolled off the showroom floor.
We hope this essential guide will encourage you to take care of easy automotive maintenance yourself. Visit the Carorbis Blog for more advice, tips & tricks, and car comparisons. You might be interested in reading about List of Discontinued cars in India and also How To Remove Moisture From Headlights?
Frequently Asked Questions
Q1. What is the Purpose of Tail Light?
Ans. Two important reasons why cars have tail lights are safe and to indicate the presence and location of a vehicle on the road. Night driving is made safe with bright red tail lights that increase the visibility of a car. Indicator signals help other motorists react before a vehicle makes a turn or changes lanes. Brake lights are a prominent feature of tail lights which automatically light up when the brake pedal is applied. It is a sign for other drivers to slow down behind a vehicle that is applying brakes. Reverse lights are integrated into tail lights and illuminate when the reverse gear is engaged. Not only do reverse lights increase visibility at the rear, but pedestrians can also move out of the way when a vehicle is backing up.
Q2. Why Do Tail Lights Stop Working?
Ans. They usually start to malfunction due to wear and tear, damage or electrical issues. One of the most common reasons for rear lights to stop working is burnt-out bulbs. The filament in these bulbs eventually burns out after a certain time period and needs to be replaced with a new one. Electrical wiring can also get damaged due to moisture, lack of insulation, corrosion or exposure to the elements. Another problem area is a blown fuse. Fuses protect electrical systems from damage, so a blown fuse will need to be replaced to get the lights reinstated. There are also a number of switches and relays that turn lights on and off, and faults in these switches can cause faulty tail lights.
Q3. Is It Necessary to Replace Both Tail Lights at the Same Time?
Ans. It is not always required to replace both lights and you can drive safely just by repairing/replacing just the faulty light. However, it is possible that the other tail light will fail soon if one of them goes bad because of the interconnected electrical wiring. Replacing both rear lights at the same time ensures symmetry, visual balance and consistent lighting. Many road transport authorities insist on functioning and matching tail lights to avoid accidents. Some important points to keep in mind here are lens colour (they can come in clear, red or yellow) and the bulb wattage. If the rear lights are not bright enough, they may fail to provide adequate safety.
Q4. How Much Does It Cost to Replace a Tail Light?
Ans. The cost will vary depending on the make and model of the vehicle, the type of tail light (LED, halogen) and the labour involved if you take your car to a service station. The rear lights for a luxury car will be far more than for a budget, hatchback car. Prices will start from approximately Rs.1000 onwards. If you are still determining which type of tail light to purchase, consult your dealership or a professional mechanic for more advice.
Q5. Should I Take My Car to the Mechanic or Replace the Tail Light Myself?
Ans. It all depends on your experience level and familiarity with tools and mechanics. Although it is a simple task if you find the job too complex, it is best to take the car to a mechanic for repairs.