If you have noticed moisture in your headlights, you may want to ask the question, how did it get there in the first place and secondly, how to remove moisture from headlights? Headlights on a car are the only components that allow a driver to see the road at night. It works as a safety device, because not only does it illuminate the road for the driver, it also makes the car visible to other motorists on the road.
If it rains often where you live, or there is a lot of humidity in the air, it is a good possibility that you will end up with moisture in your headlights. So, how do you remove moisture from headlights? Because moisture prevents the headlights from shining brightly and also affects the bulb filament which may burn out due to excessive moisture.
Removing Moisture Without Opening the Assembly
Moisture trapped in a headlight assembly can seriously obscure your night time vision. If you are looking for a way to remove moisture from your headlight, without removing the assembly, here are some tips.
Also Read: How To Fix Headlights If Not Working On A Car
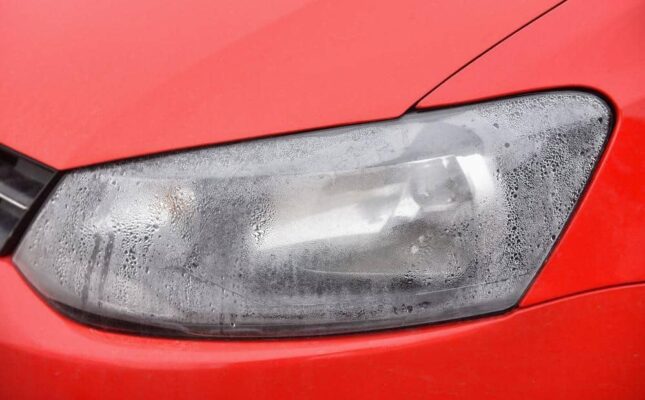
What Does Moisture Do to Your Headlights?

Moisture on the inside of your headlights is as bad as dirt or fogginess on the outside lens. It prevents the headlights from shining bright and may create blind spots in your vision that may eventually lead to an accident.
Also, moisture can damage the headlight filaments, causing them to prematurely burn out or dimming their illumination.
Most often, the moisture is due to a leak in the seal of the headlight assembly. Water then can seep in through these leaks and cause moisture to get trapped on the inside of the headlight assembly.
When the headlight is turned on, it heats up the air around it, and when switched off, it cools down and some of this air may condense as fine drops of moisture on the inside of the lens.

How Do You Remove Moisture From the Inside of Headlights?
So, how do you clear this condensation from inside the headlights?
If you do happen to find moisture on the inside of your headlights, there are a few ways that you can get rid of it, without opening the headlight seal and assembly.
It is fairly simple to break the seal of your headlights, but then you must ensure that the seal is properly put together once you finish the job, otherwise you may have the same problem of moisture creeping back in behind the lens.
A sealant is usually applied to the assembly, and if done by a mechanic, it should remain air and water tight.
Most headlight assemblies have a venting mechanism to prevent condensation from building up on the inside of the lens. If the condensation vent happens to be blocked, it may be a cause of moisture build up. The exact location of the condensation vent depends on the type of vehicle and the way the headlight is assembled.
If possible, identify the condensation vent, and wipe it of dirt or debris that may be blocking it, or try blowing it with compressed air. Be cautious not to push any debris into the headlight housing, which would mean you have to dismantle the assembly to get the dirt out.
Also Read: How To Restore Headlights At Home Professionally
What Should You Do With Lots of Condensation on the Lens?
How do you clear major condensation from inside the lens? If the amount of condensation is quite a lot, then you may have to take out the headlight assembly, but you don’t have to break the seal that keeps it air and water tight.
Use your service manual to identify the placement of the electronics, bulb and plug. Carefully take out the assembly from its housing.
Alternatively, you can use a hair dryer to blow hot air on the lens to dry up the inside of the lens of moisture without breaking the seal. The hair dryer can be used to blow hot, dry air into the ventilation duct or onto the lens directly. The heat from this may dry up the moisture.
Wait for the headlight assembly to cool off before you switch the headlight on to check if the moisture has disappeared.
If all else fails, then you have no choice but to open the seal of the headlight. Again, refer to a service manual to figure out how to remove the seal. It will most probably require the use of a heat gun to melt the seal away. The headlight assembly may also house a removable rubber seal which you can carefully pry open.
Also Read: Foggy headlights? Learn how to remove moisture from headlights.
If you do not have any experience working with a heat gun, then you can employ the services of a mechanic to get the seal undone. Provided you have a replaceable seal, this shouldn’t be too difficult.
You may need to use certain hand tools like a ratchet, screwdriver, linen cloth, silica gel packs and a rubber sealant.
Carefully take off the seal in the headlight assembly, and undo the lens from the housing. Unscrew all the attachment points. Now use the microfiber cloth to wipe off extra moisture from the inside of the lens.
Silica gel packs can be placed on the inside of the headlight assembly to absorb any moisture that may build up afterwards. Ensure that the silica gel packs are tucked neatly without obscuring the headlight bulb or the lens.
Once you have completed all these steps, reseal the headlight lens onto the assembly using a rubber sealant or silicone. Making sure that the sealant has been installed properly will prevent moisture from seeping into the lens assembly at a later time.
Also Read: Which Mirror Is Used in the Headlights of a Car
How to Prevent Further Moisture From Building Up?
If the seal has been created correctly on the headlight assembly, the chances of moisture building up on the lens is minimal. There are products out in car accessory stores that can help you create a strong seal on your headlights.
First, the seal should be examined and checked for any cracks or malformations, dust, dirt or debris. It is a good idea to use a second seal of silicon gel around the factory installed seal just to make sure no moisture can seep through.
If the headlight assembly uses a replaceable rubber seal, then you can put a new one in place. The bulbs, electrical connections and plugs make use of rubber O-rings to remain watertight. Inspect them carefully and make sure the O-rings are intact.
Use a silicone spray over the O-rings and use a silicone-based gel to cover any cracks or holes in the seal. The lens should remain water and air tight at this point.
Once you are confident that the seals are good, you can go ahead and reinstall the headlight assembly into its bracket. Install all the screws and ensure that the headlight has been installed at the correct angle to shine light appropriately. Check the bulbs, electrical connections and plugs to make sure that they are tightly fitted.
Now, turn on the headlights and have a look at the way light is shining through the lens. If all has gone well, you should be having a headlight that looks good as new. Do a routine maintenance check of the headlight at periodical intervals to ensure that the seals are holding up and the moisture has not returned to the inside of the assembly.
Also Read: How to Adjust a Car Headlight
Conclusion
Simple tools and a little elbow grease is all you need to restore the headlight assembly. It is useful because otherwise you may have an expensive headlight replacement on your hands. If moisture shows up on one of the headlights, it is advisable to check the other headlight for moisture as well. There is a good chance that you may have the same problem on both sides of the car.
A simple fix like using a hair dryer, or wiping off extra moisture with a microfibre cloth is an inexpensive fix, but if the problem recurs often or there is severe damage to the assembly, it is probably best to replace the whole assembly.
A friendly mechanic will be more than happy to have a look at your headlight if you can’t find a quick fix at home. Headlight maintenance makes sure that you have a safe driving experience at all times.
Frequently Asked Questions
Q1. Does moisture inside the headlights go away on its own in time?
Ans. If there is only a small amount of moisture on the inside of your lens, then it will probably evaporate on its own when the headlights are turned on and a bit of heat is created.
If the amount of moisture on the headlights is too much, or there is actual water on the inside of the assembly, you will have to manually open up the headlight and remove the moisture.
Q2. How do you prevent moisture from coming back into the headlights after removing it?
Ans. One of the easiest ways to prevent moisture from getting back into the headlight assembly is to use silica gel packs that will absorb the extra moisture from building up. You can use a hair dryer to heat up the lens and cause the extra moisture to evaporate off.
If you have opened the seal to clean the headlight, then make sure that the seal has been replaced properly if it is a replaceable type, or add an extra layer of silicone gel to keep the seal from cracking and letting moisture seep in again.
Q3. How does moisture get into the inside of the lens?
Ans. When the headlights are turned on, it heats up the hair around it. Once the headlights are turned off, this air cools and condenses on the inside of the lens. This ends up as moisture droplets on the inside of the lens.
If the seal on the headlights is cracked due to dirt, debris or excessive heat, then moisture can seep into the assembly and get into the inside of the lens. Using a replacement seal, or sealing up the headlight with silicone gel will solve this problem.
Q4. What problems could moisture in headlights cause?
Ans. Moisture on the inside of headlights can be a safety issue because it blocks the light shining through and prevents proper illumination of the road ahead. It may cause blind spots and obscure proper vision.
Moisture on the inside of the lens can also cause electrical problems by causing the bulb to short circuit, or sparking at the connectors which may cause a fire due to a short circuit.
The headlight bulb may fail while driving, which can be hazardous for the driver and other motorists especially at night.
Q5. How does silica gel packets help in keeping away moisture?
Ans. Silica gel packets can act as a desiccant to absorb excess moisture on the inside of the headlight assembly. Not only does it absorb moisture, it holds onto it as well. Silica gel packets are known to hold roughly 40% of their weight by absorbing excess water.
Silica gel packets can only be used as a temporary fix for excess moisture. If the problem keeps reoccurring, you will have to use a hair dryer, or if there is too much moisture, the headlight is best unassembled and cleaned of excess water.
Q6. How to clear condensation from headlights?
Ans. If condensation is not too excessive, you can use compressed air in the ventilation duct of the headlight, and make use of a few desiccant gel packets to keep condensation at bay. This should get rid of any excess moisture in the headlight assembly.
If condensation is excessive, then you can make use of a hair dryer, by using the hot air to dry up the excess condensation droplets.
Finally, if both these methods don’t work, you will have to open the assembly and dry out the excess condensation with a dry cloth. If the headlight assembly comes with replaceable seals, then change them, otherwise make use of silicone gel to seal in the lens to the assembly.